All features
Feb 11, 2024
7 min read
Introduction
Bloggrify is built on top of
- Nuxt.js 3.x
- Tailwind CSS
- Nuxt-Content
- Lucide icons
- Hyvor Talk
- and other cool stuff
It is a static blog generator that uses markdown files to generate blog posts.
Static blog generator
A static blog generator is a tool that generates a blog from markdown files. It is a great way to create a blog because it is simple, fast, and secure. It requires no database and no server-side code. It is just a bunch of HTML, CSS, and JavaScript files.
- It is secure because there is no server-side code that can be hacked.
- It is fast because there is no database to query and no server-side code to execute.
- It is simple because it is just a bunch of files.
- It is cheap because it can be hosted on a static hosting provider.
Configuration
The global configuration of the blog is done in the nuxt.config.ts file.
You can read the content of runtimeConfig.public in the nuxt.config.ts file to see the configuration of the blog.
You can configure
- the title,
- the description,
- the logo,
- the social networks (twitter, mastodon, youtube, linkedin, facebook, instagram, github) for the website
- the top menu,
- the list of authors
Read the actual nuxt.config.ts file to see the configuration of the blog.
Markdown
You can use all standard markdown features plus some extra features such as frontmatter to add metadata to your markdown files.
You can read more about it here.
SEO friendly
Bloggrify is SEO friendly. It generates a sitemap and a RSS feed. It also supports Open Graph and Twitter cards. It has been optimized for search engines.
Choose your language
The content you'll write on your blog will be in the language you choose. It's important for bots to set up the right language in the html attribute of the nuxt.config.ts file.
The default value is "en"
export default {
  head: {
    htmlAttrs: {
      lang: 'en'
    }
  }
}
Sitemap and RSS feed
This blog generates automatically a sitemap.xml and a RSS feed (rss.xml).
All content is automatically added to the sitemap and the RSS feed except the content with the listed: false property in the frontmatter.
Open Graph and Twitter cards
This blog uses the useHead composables to add metadata to the head of the pages.
All pages have a default title and description. You can tweak the image, title and description of each page in the frontmatter of the markdown file.
This is highly recommended to do so to have a good SEO, not even mentioning that your blog will look broken if you don't define title for each page...
Robots.txt
By default, the robots.txt allows all robots to crawl the website. It's possible to modify the robots.txt file in the public folder.
For example if you don't want to allow chatGpt or yandex:
User-agent: GPTBot
Disallow: /
User-agent: yandex
Disallow: /
Performance
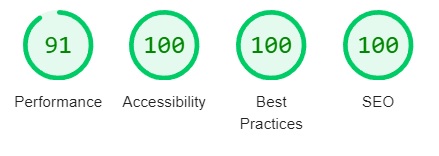
Performance are an important part of SEO. Here is the lighthouse score of this blog:
| index page | blog post |
|---|---|
 Lighthouse score for the index page |  lighthouse score for the blog post page |
Performance could vary depending on the server and the network and images you use in your blog.
Comment system
You can enable comments on your blog. It uses Hyvor Talk.
Comments are a great way to interact with your readers. It's a great way to get feedback and improve your content.
On a static website, you don't have a database. But you can use a third-party service to add comments to your blog.
I use Hyvor talk for this blog. You can enable it by adding the following code to the nuxt.config.ts file:
            comments: {
                enabled: true,
                hyvor_talk: {
                    website_id: "YOUR_HYVOR_TALK_WEBSITE_ID",
                },
            },
Replace YOUR_HYVOR_TALK_WEBSITE_ID with your Hyvor Talk website id.
Flexible file structure
You can organize your files as you want. You can create folders and subfolders and you can choose the URL of your blog posts.
Each file under the content directory will be transformed into a page of the blog.
All the files are markdown files with a frontmatter at the top of the file. They are all listed on the index page, except the ones
- with the
draft: trueproperty. - with the
listed: falseproperty.
The url of the page is the path of the file, without the .md extension.
It means you can define the url structure of your blog by organizing the files in the content directory.
For example, you can have url like /2024/01/files_hierarchy if the file is located at content/2024/01/files_hierarchy.md.
It is highly recommended to use a hierarchical structure for the files, to make the blog more organized and to make the urls more meaningful.
Analytics
You can add any analytics tool to your blog.
You just have to modify the nuxt.config.ts file to add the tracking code of your analytics provider.
For example, to add Pirsch, you can add the following code to the nuxt.config.ts file:
export default {
    app: {
        head: {
            htmlAttrs: {
                lang: "en",
            },
            script: [
                {
                    src: "https://api.pirsch.io/pirsch.js",
                    id: "pirschjs",
                    defer: true,
                    "data-code": "YOUR_PIRSCH_CODE",
                    type: "text/javascript",
                },
            ],
        },
    },
}
Replace YOUR_PIRSCH_CODE with your Pirsch code.
Table of content
The table of content is a great way to help your readers navigate through your blog post. It can be displayed as a sidebar or directly inside the blog post.
- If you want to display the table of content as a navigation sidebar
- If you prefer to display the table of content directly inside the blog post, you can use the
tocshortcode.
Requirements
In order to display the table of content, you need to use several markdown headers. The table of content will be generated based on the headers.
Example:
## Title 1
## Title 2
## Title 3
Only the headers with a level 2 will be displayed in the table of content.
Table of content with a shortcode
The table of content can be displayed directly inside the blog post by using the toc shortcode.
:toc
Example :
Table of content as a sidebar
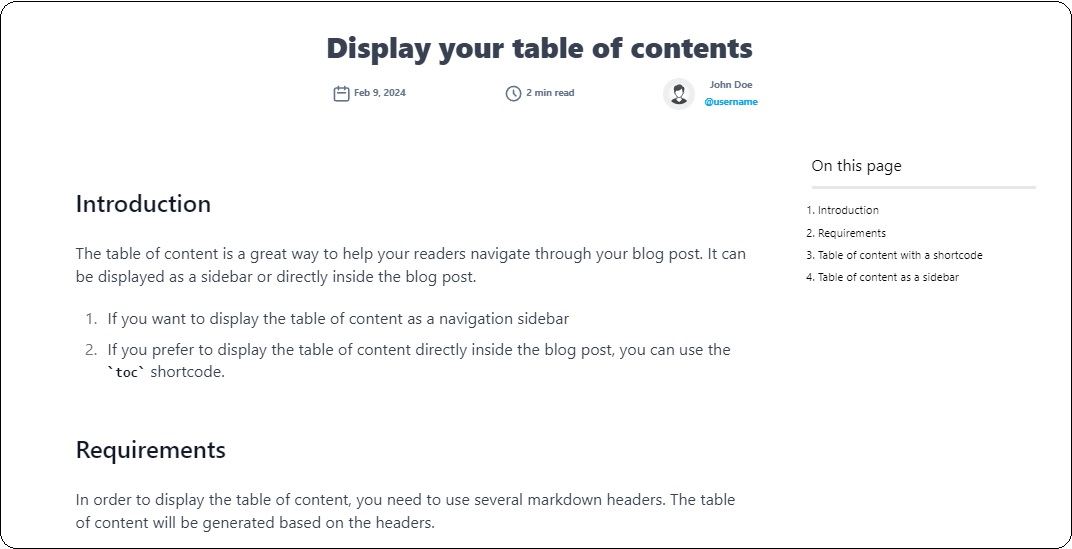
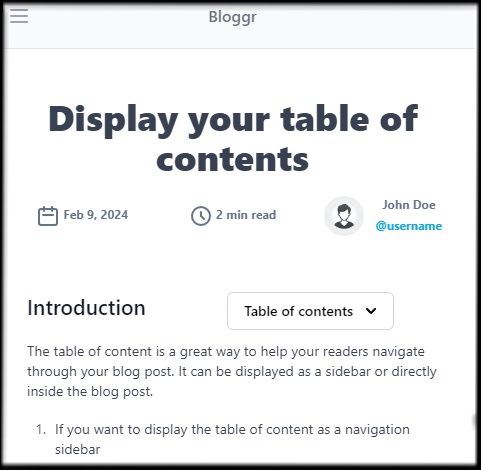
The sidebar will be displayed on the right side of the page on desktop and just below the blog post on mobile.

The table of content is responsive and will be displayed on the right side of the page on desktop and just below the blog post on mobile :

You can enable it by setting the table_of_contents front matter to true or you can enable it globally in the nuxt.config.ts file.
First method : front matter
Enable the table of content by setting the table_of_contents front matter to true only for the blog post you want to display it.
It will override the global configuration.
---
table_of_contents: true
---
Second method : nuxt.config.ts
Enable the table of content globally in the nuxt.config.ts file. It can be overridden by the front matter to disable it for a specific blog post.
// nuxt.config.ts
export default {
    runtimeConfig: {
        public: {
            table_of_contents: true,
        },
    },
};
Newsletter
You can add a newsletter to your blog to keep your readers updated when you publish new content.
The tricky part here is that this blog is a static site, so you can't use a traditional newsletter service, or you'll have to manually send out emails every time you publish a new post and that's not very practical.
Instead, you can use a RSS-to-email service to create a newsletter and then add a form to your blog to allow your readers to sign up. This is the approach I'm using for this blog. I'm using Mailerlite
Of course you can use another service, here you'll find an example of how to do it with Mailerlite but please feel free to use any other service you like.
Enable RSS feed
The RSS feed is enabled by default in this blog, you can find it at /rss.xml. You can check it by going to https://yourblog.com/feed.xml.
Create a Mailerlite account
Go to Mailerlite and create an account.
Create a new form
Go to the forms section and create a new form. You can create a simple form with just an email field. Don't worry about the design, we won't use their form, we'll create our own.
Look at the "HTML code" section and copy the form action URL, it should look like this:
<form action="https://assets.mailerlite.com/jsonp/ID1/forms/ID2/subscribe"" method="post">
Copy the form action URL, you'll need it later.
Add the form to your blog
You just have to enable the newsletter section in the nuxt.config.ts file and add the form action URL you copied before.
newsletter: {
  enabled: true,
  form_action: "YOUR_FORM_ACTION_URL",
},
Create a new campaign
Go to the campaigns section and create a new RSS campaign. Then, the rest should be straightforward, just follow the steps.
And voilà! You have a newsletter for your static blog. People can sign up and they'll receive an email every time you publish a new post.
